terça-feira, 11 de outubro de 2011
Quick repairs
Break Light Circuit Light is On:
• Burnt out or poorly seated stop light bulb(s), faulty break light switch or wiring. Sometime changing to BMW bulbs work.
Water Fluid Leaks:
• Small hairline cracks, leaking water pumps, loose hose clamps, faulty O-rings in the hoses going to the transmission.
What are the cause of engine overheating?
• Thermostat, water pump, faulty radiator or radiator cap, low radiator fluid, blown head gasket, air in the coolant circuit (bleed it).
Engine Won't Start:
• Check: battery, starter, fuse(s), relays, fuel pump, faulty spark plug resistor pack(s)... If you have no fuel and no spark, check the crankshaft position sensor or the fusible links.
Steering Shaking:
• Tire balancing, alignment, faulty tires, wheel bearings, warped brake rotors, worn out steering parts...
My Heater fan doesn't work in speeds 1 through 3?
• Check your sword or resistor pack
My battery is dead, I am lock out, how do I unlock the doors?
• To unlock the passenger door, turn the key past the normal unlock position while raising the door handle. Release handle and lift again to open the door.
Why my radio, windows, stereo, wiper don't work?
• Replace Fusable link under hood or under backseat.
Why my low beams go out sometimes?
• Re-solder Joint in LKM
Why my speedometer doesn't work or is erratic?
• Clean or change the speed sensor in differential.
Why my fuel level is erratic?
• Capacitors or fuel level sensor, change or clean with WD40
Unable to open the glove box Solution
Slide under the glove box and you will find two snap latches connecting the back of the glove box to a metal rod (horizontal). Unsnap these two latches and the entire glove box will now be able to move forward by about 1/2".
This will allow you some space to access and manipulate the latch from the top right edge of the box. Use a long, thin flat blade and depress the latch. (I had to look at a new replacement piece to understand what part of the latch to depress).
With the glove box open, you will need to replace the latch. You will not need to replace the lock.
Coolant smell and steam on window (thanks to Jeff)
There are really three (related) items that might have failed.
- a heat core element
- an inlet pipe
- an o-ring seal
All require the same basic path to fix. If you can tolerate it (depends how bad it is), many of us live with a slight leak. My E34 has the same problem and I occasionally have a slight antifreeze smell and/or get window fog. The fix at the shop is not cheap. The unit's buried in the dash and labor is big part of the bill. I've heard numbers of $600 and up...maybe someone share what they have paid. You can DIY if you are handy and don't mind taking the dash apart.
Locked doors
A great thing with the Bmw E34/E32 is that it is almost impossible to open
the doors without the key... But when your battery dies this feature might get
you stuck outside of your car.
2. Pull up the door handle.
3. Turn the key counterclockwise to emergency unlock position 1.
4. Open the door.
5. Close doors and turn the right front door lock to the synchronize position 5.
This is for the driver door. The passenger door is the mirror image of the picture
Unlocking procedure:
1. Insert the master key into the front right door.2. Pull up the door handle.
3. Turn the key counterclockwise to emergency unlock position 1.
4. Open the door.
5. Close doors and turn the right front door lock to the synchronize position 5.
This is for the driver door. The passenger door is the mirror image of the picture
sexta-feira, 7 de outubro de 2011
LCD Pixel Failure Repair
A common problem with the E34´s instrument clusters is with time the LCD pixels start to fade away just like the one in the picture below.

The problem may be fixed by perchasing a new ribbon cable.

The ribbon cable is connected from the dashboard circuit board to the LCD module.
Procedures
1. Open the back part of the instrument cluster ( fairly simple )
2. Take off the plastic coverings were the LCD module is located.
3. Remove the old ribbon cable from the LCD module and dashboard circuit board.
4. Wipe off any excess dirt from the LCD module were the old ribbon cable was connected and do the same with the dashboard circuit board. Be very carefull with the LCD module beacuse it cracks easily.
5. Now comes the tricky part. Look closely at the LCD module with a strong bright light and you will see a bunch of connectors. The grey lines you see on the ribbon cable have to bee aligned with the lines you see on the LCD otherwise it wont work. It requires a bit of patience so take you time.
6. Be very carefull with the LCD module because i cracked mine trying to connect the ribbon cable.
Hope this helps!!!!!
The problem may be fixed by perchasing a new ribbon cable.
The ribbon cable is connected from the dashboard circuit board to the LCD module.
Procedures
1. Open the back part of the instrument cluster ( fairly simple )
2. Take off the plastic coverings were the LCD module is located.
3. Remove the old ribbon cable from the LCD module and dashboard circuit board.
4. Wipe off any excess dirt from the LCD module were the old ribbon cable was connected and do the same with the dashboard circuit board. Be very carefull with the LCD module beacuse it cracks easily.
5. Now comes the tricky part. Look closely at the LCD module with a strong bright light and you will see a bunch of connectors. The grey lines you see on the ribbon cable have to bee aligned with the lines you see on the LCD otherwise it wont work. It requires a bit of patience so take you time.
6. Be very carefull with the LCD module because i cracked mine trying to connect the ribbon cable.
Hope this helps!!!!!
terça-feira, 4 de outubro de 2011
Bleeding the Coolant M30
Whenever the coolant is drained, it should be bled after re-filling. As usual, Bentley is skimpy on this one. Ref. pg. 170-9
"- On M30 engine: Loosen bleeder screw on thermostat housing."
"- Add coolant to expansion tank until it spills from screw. Tighten screw."
Basically this is it, but I also "burp" the air out of the system by squeezing the radiator hoses. The bleed screw is on the top of the thermostat housing:

There is also a brass hex-head plug between the 2 temperature sensors on the thermostat housing. You can remove it & fill it with coolant with a funnel until it spills over, & replace the plug, this will help the bleeding.
I bleed mine when it's cold & not running, on a slight incline with the small radiator/expansion tank return hose on the radiator at the highest elevation:
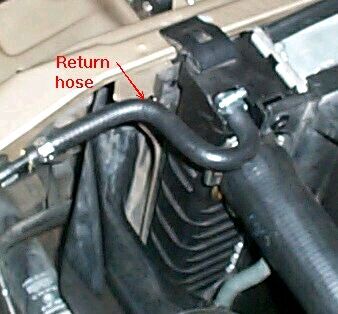
Afterwards, start the engine with the expansion tank cap off . Once the engine warms up enough to open the thermostat, small stream of coolant should flow near the fill cap letting you know the bleeding has been successful:
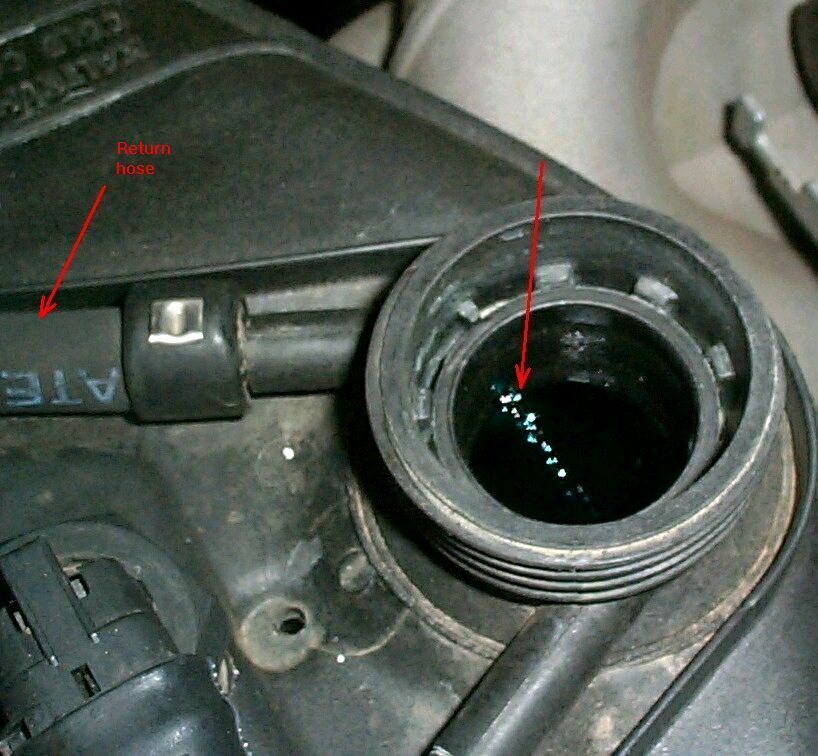
If this small stream of coolant doesn't flow, then check the return hose & give it a blast with compressed air or snake it with weed eater line to make sure it's not clogged. If it is clogged, the bleeding will not likely be successful. If necessary, repeat the bleeding process after the car has been driven a few miles & cooled off again.
"- On M30 engine: Loosen bleeder screw on thermostat housing."
"- Add coolant to expansion tank until it spills from screw. Tighten screw."
Basically this is it, but I also "burp" the air out of the system by squeezing the radiator hoses. The bleed screw is on the top of the thermostat housing:
There is also a brass hex-head plug between the 2 temperature sensors on the thermostat housing. You can remove it & fill it with coolant with a funnel until it spills over, & replace the plug, this will help the bleeding.
I bleed mine when it's cold & not running, on a slight incline with the small radiator/expansion tank return hose on the radiator at the highest elevation:
Afterwards, start the engine with the expansion tank cap off . Once the engine warms up enough to open the thermostat, small stream of coolant should flow near the fill cap letting you know the bleeding has been successful:
If this small stream of coolant doesn't flow, then check the return hose & give it a blast with compressed air or snake it with weed eater line to make sure it's not clogged. If it is clogged, the bleeding will not likely be successful. If necessary, repeat the bleeding process after the car has been driven a few miles & cooled off again.
Advanced BMW ABS hints and tips
ENGINE APPEARS TO MISFIRE OR STUMBLE INTERMITINTLY
MODELS AFFECTED: 5 Series(E34), 7 series(E32), 8 series(E31) all equipped with ACS.
FAULT: Under certain specific conditions an apparent engine misfire or bucking may occur. This is not
an engine misfire.
CAUSE: Short (less than 100 milliseconds) fuel injection cut-off, as a result of MSR (engine drag torque
control) regulation. This is a normal ASC function that may occur under these conditions:
   -The vehicle is equipped with ASC
   -Vehicle speed between 45 and 60 MPH
   -A rough road surface (e.g. potholes, railroad tracks)
   -Light throttle(accelerator pedal only depressed 1/8)
   -ASC not switched off.
SOLUTION: Replace the ASC control unit. no further diagnosis of the ABS/ASC system should be
necessary.
ABS WARNING LIGHT ON MODELS AFFECTED: 3 series (E36) and Z3 produced up to 5/96 FAULT: The ABS warning lamp is on in the instrument cluster, and fault code 145 (pump inoperable) stored in the ABS control module memory. CAUSE: Faulty relays produced prior to may 1996. SOLUTION: Use the DIS tester to confirm that fault code 145 is set in the ABS control unit. Work through test instructions in DIS confirm that the fault is not caused by any other components. Then replace the gray ABS pump motor relay, witch is located in the power distribution box, rear left side of engine compartment.
MICROPROCESSOR CONTROLLED ABS(uC-ABS)STORES ERRONEOUS INTERNAL DEFECT FAULT
MODELS AFFECTED: 7series(E32)-vehicles produced 06/91 and later, equipped with M30 engine.
5 series (E34)-vehicles produced 9/91 and later.
FAULT: Increasing number of uC-ABS control units are being returned for showing internal defect during
troubleshooting and readout of the fault memory. In most cases the fault is erroneous.
CAUSE: If the ignition is switched on with the cap of the D100 diagnostic connector removed, the erroneous
fault can be set by a low voltage condition on the TTD lead to this control unit.
SOLUTION:
   -Erase the fault in the uC-ABS fault memory, while the diagnostic module is still connected and the
    ignition is switched on.
   -Before disconnecting the diagnostic cable, switch off the ignition
   -Reconnect the cap for the D100 diagnostic connector, then switch on
    the ignition again.
   -Do not replace control unit.
ASC AND/OR ABS WARNING LAMP ON
MODELS AFFECTED: 3 series (E 46), vehicles produced up to 9/98
FAULT: The ASC and/or ABS warning lamps are on, with fault code 31 or 41(rear wheel speed sensor) set
in memory.
CAUSE: Faulty rear wheel speed sensor.
SOLUTION: Replace the wheel speed sensor with a sensor with production date 22/08 or later.
ASC LAMP ON, FAULT CODES
MODELS AFFECTED: E38(7 series), E39 (5 series) with M62, or M73 engine.
FAULT: The ASC lamp is on and no fault codes are stored. If the under hood diagnostic connector is
removed the ASC lamp goes off.
CAUSE: Incorrect under hood OBD cap fitted.
SOLUTION: Install correct OBD connector cap (part number 12 52 1 703 202).The part number is inscribed
into the OBD cap moulding
ABS WARNING LIGHT COMES ON
MODELS AFFECTED: All with ABS
FAULT: ABS warning light comes on intermittently. Normal troubleshooting procedures find no defect.
CAUSE: If cars have recently had two new tires, or snow tires put on. Sometimes when the car is driven
over 50 MPH.
SOLUTION: Check all four tires on the car, make sure they are the same brand, style, and size. Check if
any of the new tires have substantially more tread than the rest. These differences may cause enough
variance in rolling diameters to confuse the ABS control unit, which intern gives a false signal to the ABS
warning light.

ABS WARNING LIGHT GLOWS
MODELS AFFECTED: 3 series (E 36)-vehicles produced 1/96 to 3/96 without ASC.
FAULT: On rare instances the ABS warning may glow slightly after other electrical consumers have been
switched on. No fault is stored in the ABS control module fault memory.
CAUSE: Hardware fault in the ABS control module.
SOLUTION: If this is encountered replace the ABS control module.

ABS, ASC, AND ASC+T MALFUNCTION
MODELS AFFECTED: All models equipped with ABS,ASC OR ASC+T
FAULT: Any of the ABS ASC and ASC+T systems inoperative, intermittently inoperative, or illuminating
the warning lamp.
CAUSE: All BMW'S with slip control systems use 4 wheel speed sensors which monitor each wheels
speed of rotation with a high accuracy. The system control unit uses this information to calculate a
vehicle speed. In this way it detects wheel speed variation. If the inputs vary from each other by a certain
amount, the control unit is not able to do the calculation reliably (plausibility fault) and takes its self
off-line as a safety precaution(fail-safe).This can be because the wheels and tires are non-approved parts
and therefore do not agree with the system.
SOLUTION: Make sure the vehicle is fitted with BMW approved wheels and tires. Then do further
diagnostic testing to check if fault is resolved.
EXCESSIVE NOISE FROM ENGINE COMPARTMENT AFTER FIRST STARTING OFF(ABS SELF TEST)
MODELS AFFECTED: 3 series (E 36)- four door models only
FAULT: A noise(described as a rattle, groan or growl) occurs only after the engine is started and the
vehicle is put into motion. The noise is heard in the first 30 feet and only last a second.
CAUSE: Most of the time the noise is from the pump activation portion of the ABS self-test.
SOLUTION: The self test noise cannot be eliminated, can only be reduced, and even then not in all cases.
One way is to install insulated brake lines (only on vehicles produced before 03/92).

ABS, ASC/DSC, ECM FAULTS
MODELS AFFECTED: E38(7 series)
FAULTS: The wire harness can get damaged. ABS, ASC/DSC ECM faults show:
  - 66 wheel sensor signal supply voltage
  - 67 intermittent interference
  - 5,6,7 wheel speed (plausibility)
  - 30 left rear wheel sensor
CAUSE: The sharp edges on the tilt sensor(NAG) bracket damage the wire. The leak diagnosis pump(LDP)
and the wire harness from the left rear wheel sensor is routed through the slot in the tilt sensor(NAG)
bracket.
SOLUTION: Remove the tilt(NAG) sensor, located behind the wheel arch in the left side of the trunk. Tape
the sharp edges of the tilt sensor bracket with electrical tape to prevent further damage to the wire harness.
Repair the wire harness and reinstall the tilt sensor. Using the DIS tester clear the fault codes.
BREAK INDUCED STEERING VIBRATION
MODELS AFFECTED: E46 and four door models produced prior to 10/99.
FAULT: Steering vibration when breaking, usually in the 50 to 60 MPH range.
CAUSE: The front axle on some cars is extremely sensitive.
SOLUTION: Remove front brake rotors and pads, also replace steering coupling and torx bolts with new
parts. Make sure the front wheel assemblies are balanced before re-installing. If the vehicle has dampened
hydraulic lines they need to be removed and replaced with original lines.
TWITCH FELT IN STEERING WHEEL ON RAPID BRAKE APPLICATION
MODELS AFFECTED: E46 not equipped with DSC.
FAULT: When the steering   wheel is held very lightly with one hand and the brakes given a quick tap, it
may twitch slightly once. There is no disruption of stability of the car and doesn't pull to either side.
CAUSE: Could be from having unequal amounts of toe-in on each front wheel or because of a very slight time
difference in the build up of pressure in each front brake caliper.
SOLUTION: If the alignment has been corrected, you can install a dampener to modify the brake pressure
build up curve.(If the vehicle is equipped with DSC a dampener can't be installed because it will affect the DSC
operation).

ABS REAR WHEEL SPEED SENSOR
MODELS AFFECTED: 3series (E36)- 1992 models
FAULT: After diagnosis of a ABS system using the BMW service tester the following faults may be set:
  - 84 or 88 wheel speed sensor missing or defective, left rear/right rear.
  - 100 or 104 wheel speed signal not plausible, left rear/right rear.
CAUSE: The ABS wheel speed sensor at either rear wheel have poor solder connections at the coil connections.
SOLUTION: The solder connections were improved in production from date code 0811(81st day 1991). If the
date code of the failed sensor is 0801 or lower, both rear wheel speed sensors need replacing.
ABS HYDRAULIC UNIT
MODELS AFFECTED: 1993 318 is, 1993 325is, 1994 345 ic.
FAULT: It's possible that during the assembly of the ABS hydraulic units of these vehicles, the six bolts which
fasten the bottom cover of the unit to the housing were not tightened properly.
SOLUTION: All affected vehicles(identified by the DCS inquiry) hydraulic units need to be checked by torquing
one bolt on the bottom cover to 15 Nm. If it turns the unit must be replaced.
Removing the airbag and changing the dash bulbs
1. First you disconnect the negative battery cable. This is critical. Make sure you have the code for the radio before doing this.Its very important that you disconnect the battery before doing anything else, if you don't you will trip the airbag code when you turn the key to remove the
steering wheel... I have had many many emails from people who didn't do this and now want to know how to turn the airbag light on the dash off...


2. Wait a few minutes for the airbag to discharge, then remove the 2 philips screws that hold the steering column
cover on the bottom.

Make sure you disconnected the batteryThen you remove the bottom cover on the steering column. When thats removed you will see a orange connector.
Thats the airbag connector. Squeeze the clip ends and seperate the connector. Remove the end that goes to the steering
wheel from the post its fastened to.

Using a T27 torx socket or driver then remove the 2 screws on the back of the steering wheel that hold the airbag in place.

Next you carefully lift the airbag assy off of the wheel and disconnect the plug on the back. It comes straight out to remove. Then set the airbag aside in a place where it won't get disturbed or damaged.

Then you remove the 22mm self-locking nut that holds the steering wheel on. This nut is to be replaced as it's only intended to be used
once. The torque when reinstalling is 59 ft.lbs. Once that nut is removed, mark the steering shaft and the wheel with a marker. A line across both so you can put the wheel back on in the same place. Put the key in the ignition next and turn to the run position. The wheel will then lift off.

Once the wheel is out of the way you remove the 2 philips screw that are in the top of the instrument cluster and carefully pull the
cluster out far enough to remove the wiring connectors on the back. There are little levers you raise to release the connectors.


Next lay the instrument cluster down on a towel or mat to protect the face and on the back is most of the bulbs. To get
to the 3 that provide the main illumination at night you have to turn the 2 latches counterclockwise 1/4 turn and swing the back
panel up. The rest of the bulbs are on the back panel.
This car was a 1990 525i, it had:
6 - 1.5 watt bulbs
3- 3 watt bulbs
13- 1.2 watt bulbs
The 1.5 watt bulbs I had to get from Bmw, all the rest were available through aftermarket sources. The 1.5s provide the lighting
for the gear indicator on an automatic,the check instrument display, the service indicator and the odometer. These are the ones that are on most of the time.
The 1.2s I wasn't as concerned about changing since they aren't on nearly as much. These are all the warning lights, turn signals, bright indicator etc.
The 3 watts I changed since they are the gauge lighting at night.


I think that about covers it all. Then put it back together in the reverse. Make sure you don't hook up the battery until the very last. Turn the key off after the steering wheel is installed, then reconnect the battery.
Otherwise it will trigger an srs code and have to be reset. One other note, On most of the other e34 models the battery is under the rear seat. To gain access just pull up really hard on the front bottom of the seat. While your in there you can look at the bottom of the steering wheel where the copper paste is and spread it around if you have a squeaking problem. A few other notes as well. Some models will
have a nut holding the steering wheel on , some will have a bolt instead. You don't abolutely have to replace the bolt or nut, you can just use loctite on it if needed. Also some airbags will take a t27 torx, some will take a t29 torx.
sexta-feira, 30 de setembro de 2011
Subscrever:
Comentários (Atom)